
I am an avid stamper/crafter and have been collecting and teaching stamping classes since 1984. I teach classes on the Cricut Machine and Cricut Craftroom, the Cricut cake machine and the Gypsy. My classes are designed to teach the beginner as well as the advanced users. NOW I AM COPIC MARKER CERTIFIED! This awesome line of products is permanent and very user friendly.
MY INTERMEDIATE COPIC CERTIFICATION
Monday, October 31, 2011
Saturday Class at the Prescott Hobby Lobby
Thanks to those who attended the class. I really enjoyed spending time with you. Hope you learned a bunch and are ready for class next Saturday at the same place from 10 to 1.
Wednesday, October 26, 2011
COPIC CREATE A BOOK CLASS WITH JENNIFER DOVE THIS WEEKEND
Sadly, the weekend is over but the memories will be etched in my memory forever. The entire experience can be summed up in one word; awesome!
Jennifer is as nice in person as she is on her blog. She is extremely talented and I was fortunate to have been at her retreat.
I am now anxious to get started sharing the knowledge she passed on to me and 37 other fabulous ladies!!
I will start by scheduling class at the Hobby Lobby store in Prescott Valley on Saturday October 29th and Saturday November 5th.
Email me at cornvillecountrycrafts@gmail.com or call at 928-649-8880 for more information.

 We will be learning water, snow and transparency. I will provide a review for those who need to go back and review a few techniques!
Jennifer is as nice in person as she is on her blog. She is extremely talented and I was fortunate to have been at her retreat.
I am now anxious to get started sharing the knowledge she passed on to me and 37 other fabulous ladies!!
I will start by scheduling class at the Hobby Lobby store in Prescott Valley on Saturday October 29th and Saturday November 5th.
Email me at cornvillecountrycrafts@gmail.com or call at 928-649-8880 for more information.


Friday, October 21, 2011
Past Month Has Been Very Busy


COPIC CREATE A BOOK CLASS WITH JENNIFER DOVE THIS WEEKEND
Hello,
The class in Chandler starts today and I am so excited I could pop!!!
It looks like Jenn will keep us busy from tonight on through Sunday night!! Will have more to post when I get back. I am scheduled to teach an advanced Copic class on Saturday the 29th at Hobby Lobby in Prescott, Arizona. Hope to see some of you there!!!
Saturday, August 13, 2011
SENTIMENTALS CARTRIDGE AND COPIC MARKERS


Yesterday I finally put together a card that has been going around in my head for awhile. I wanted to use the desk, and chair image from the Sentimentals Cartridge and the mirror from Lacey Labels. I cut the layer on the desk a bit larger to give the allusion of four legs on the desk. Not sure it worked but here it is. I then colored the images using my Copic markers. The backroound paper is Teresa Collins from a paper stack I bought through MY Steals. I could have printed some similar designs using the Imagine Baby Boutique Cart, but since this one looked more like wallpaper, I decided to go with it. The card is 5 inche square and so needed a matching brown envelope. I used the envelope on the Imagine machine using the Imagine More Cartridge and just used the cut only function on brown cardstock (No need to use up the ink on the Imagine when doing a solid color when my paper stash is full of solid 12 inch cardstock!).
I distressed the edges of mirror, the desk and the chair with Galaxy Gold Brilliance inkpad, I also used the gold inkpad and a sponge to distress the finished card. I love the effect of the gold so I outlined the desk and chair with a gold fine tipped pen.
I am trying to figure out the perfect Sentiment for this card. Any ideas??
Sunday, July 10, 2011
SWEET TOOTH BOXES AND FLOWER SHOPPE CRICUT CARTRIDGES


I distressed the edges of the flowers and the light colored box with gold and brown ink pads and a small sponge. I also cut a liner about 1/4 inch smaller than the outside box for stability, then assembled it and put it inside the the original box.
I then sprayed the flowers and lids with spray adhesive and covered them with glitter from Art Institute of Glitter in Cottonwood, Arizona. I call the Art Glitter store the happiest place in Cottonwood and will be teaching a class on August 27th on these boxes. Every student will take their box home with them to use as a gift box or just a to enjoy themselves. More information can be obtained at the Art Glitter Institute or call 928-639-0805
Wednesday, June 22, 2011
CRICUT IMAGINE MACHINE
Yes, I did take the leap and buy the Cricut Imagine! I got a really good deal on it and have seen it on ebay for 160 dollars!! The machine is so cool! It will print and cut out images from both my original file of cartridges and the new Imagine cartridges. Hooked up to my Gypsy it can do everything my Expression 2 can do and more. The major drawback right now is finding replacement ink cartridges (although I do not need them yet, I like to have a couple on hand just in case because it is a long drive to find one around here!)
I am waiting for an RMA label for the my Gypsy though, because it has a charging issue (it is over a year old but they will still fix it for me at no charge!) Love the customer service at Provo Craft!!
I do not have any pictures of projects to post yet, but I will soon. I have been playing with it working on my grandson's second scrapbook.
I have seen some posts asking why anyone would need a machine that prints when you can cut out images on printed paper or use the Copics to color the images yourself. I actually felt that way myself until I got into researching the Imagine. I must admit, I am a gadget freak!!! I love learning about the latest gadgets and figuring out the bugs. I did the same thing recently with the IPhone Tiffany got me for Mother's Day.
I am hoping technology will keep my brain cells from drying up with old age!!!
I wish I could update you on the new program from Provo Craft that is to replace Design Studio called Craft Room, but so far they don't have a release date.
Tuesday, June 14, 2011
USING JUST-RITE STAMPS DOWN BY THE SEA


This is a template card with at least three layers. Hope you like it! No special occasion card, just one I felt from my heart!
I used the Just-Rite stamp set and colored the images with my Copic markers. I love the way the template pops out in 3D!!
I cut out the ovals using Lacey Labels Cartridge and Design Studio to get them just the right size for the stamps!
THE RHYME OF THE ANCIENT MARINER
 |
| 3D CARD |
Here is to all of the teachers who inspire their pupils as she inspired me. By the way, all of my classmates hated her and laughed at her. I thought she was the smartest person alive!!!
CRICUT AND COPIC PROJECT
Here is a card I saw on a blog I subscribe to and changed it to use my Copic markers.
First I cut the jars from the Doodlecharms Cartridge using the shadow mode at 51/2 inches. I then flipped one side and welded them together on my Gypsy. I then cut the normal jar image at 5inches.
 I think I cut the fish using Paper Dolls for Everyday The bubbles came from A Child's First Year
I then folded the welded jars to make the card. I used the Copic BG000 for the shadows on the jar and Y25 and 28 for the lid. I used Y13 and Y08 for the fish, and accented with YR68. I then used the BG000 again for the bubbles and added a line of Bahama Blue Memento Marker on the bubbles. I coated the fish and the bubbles with Diamond Glaze and let them dry.
The sentiment was done using Office 2007 and cut out with an oval punch from Stampin Up.
First I cut the jars from the Doodlecharms Cartridge using the shadow mode at 51/2 inches. I then flipped one side and welded them together on my Gypsy. I then cut the normal jar image at 5inches.

I then folded the welded jars to make the card. I used the Copic BG000 for the shadows on the jar and Y25 and 28 for the lid. I used Y13 and Y08 for the fish, and accented with YR68. I then used the BG000 again for the bubbles and added a line of Bahama Blue Memento Marker on the bubbles. I coated the fish and the bubbles with Diamond Glaze and let them dry.
The sentiment was done using Office 2007 and cut out with an oval punch from Stampin Up.
I HAVE BEEN BLOGGER DELINQUENT


Friday, April 29, 2011
COPIC MARKER COLORING GREENS AND WATER
I tried to duplicate the colors on the stamp which is called "Water Fairy" from Janlynn.com. I am not big on fairies per se but I do love this stamp. The colors I used are BG93, G0000, G12, G99, YG 93, YG 23, Y0000, YR 000, E 00, E29, E31 and R01. My redition came out a bit darker than the image on the stamp, but this was my first attempt and I will keep working on it while in San Diego next week.

Monday, April 25, 2011
CHANCE TO WIN THE NEW ANNIVERSARY EXPRESSION2 MACHINE
Just follow this link and win a new machine, to be given away tonight!!
http://www.cricutholiday.com/2011/04/enter-here-to-win-new-cricut.html
http://www.cricutholiday.com/2011/04/enter-here-to-win-new-cricut.html
Tuesday, April 19, 2011
HATS FOR DYAN'S QUILTING CLUB LUNCHEON

CREATIVE KEEPSAKE SHOW IN MESA ARIZONA
This is just one segment of the show which was a candy store for papercrafters! Thank you, Connie, for driving!

While at the show in a perchance meeting with an employee of Provo Craft, I told her about the power cord melting in my Cricut Expression, she suggested I call them even though my machine is 14 months old and out of warranty. I took her advice and could not believe it!! They are replacing my machine, free of charge. I am now waiting for the RMA label (free shipping). I am so thrilled with the customer service, I am actually blown away by Provo Craft!!! Kudoos to them!!
Saturday, April 9, 2011
COPIC CLASS 202 AT THE PRESCOTT HOBBY LOBBY
This was a perfect day to be in Prescott!! The class seemed to soak up the new information about coloring faces and hair like a sponge. Eveyone has increased the size of their marker stash by about 300%. I am hoping everyone finds the time to practice, especially shadows and highlights!!!
The next class is scheduled for May 21st and we will be advancing our coloring to maximize the Copic Marker blending and shading features. I will be introducing the class to the Copic AirBrush System!! Stay tuned for more information. I will be taking the Advanced Copic Certification Class this Monday in Phoenix. I am so excited to actualy be meeting Debbie Olsen in person!
The next class is scheduled for May 21st and we will be advancing our coloring to maximize the Copic Marker blending and shading features. I will be introducing the class to the Copic AirBrush System!! Stay tuned for more information. I will be taking the Advanced Copic Certification Class this Monday in Phoenix. I am so excited to actualy be meeting Debbie Olsen in person!
Monday, March 28, 2011
COPIC CLASS 202 AT THE PRESCOTT HOBBY LOBBY
Well the big day for class 202 is almost here. I should mention that the markers you want and need are he SKETCH OR CIAO MARKERS!!. The Origina markers have a different tip and not the brush tip that we need for the blending techniques.
Here is the list of markers again for this class:
E0000, E000, E01 or E00, R0000 or a close pale red: hair colors:
Brown hair: E23, E29 or E49(darker shadeS) Blonde hair Y26, Y28 and
Y0000 or similar. Black hair 100 or 110 (you don't need both), gray
N0 or N03. You don't need all of these just get the ones for the
color hair you want to make. Oh I forgot redheads (no offense
intented) redhair colors are E23, E35 and E11.
clouds B21 or B91
I am so looking forward to seeing all of you again, thank you for being there!!!
Saturday, March 19, 2011
CRICUT CLASS AT THE ART INSTITUTE OF GLITTER COTTONWOOD AZ
The first Cricut Class will be held at the Art Institute of Glitter in Old Town Cottonwood on Saturday April 9th from 10AM until 1PM. The cost for the 3 hour class is $39.95 and will include all supplies.
This is an adult class but high school students are welcome to enroll.
The class will consist of basic instruction in the use of the Cricut Machine, anyone owning a machine is encouraged to bring it and instructions will be based on your individual machine for you.
There will be classes scheduled for children 12 and over in the near future. I will keep you posted as that time gets closer.
All classes will include the use of glitter to glitz up your final make and take project.
 The first class will be the boot card which will also include the use of some simple to intermediate scrapbooking techniques. You will make a "Bootday" card with the sentiment inside reading "Kick back on your day."
"
This is an adult class but high school students are welcome to enroll.
The class will consist of basic instruction in the use of the Cricut Machine, anyone owning a machine is encouraged to bring it and instructions will be based on your individual machine for you.
There will be classes scheduled for children 12 and over in the near future. I will keep you posted as that time gets closer.
All classes will include the use of glitter to glitz up your final make and take project.

"
Tuesday, March 15, 2011
FIRST COPIC CLASS AT HOBBY LOBBY WAS A BLAST!
I had lots of fun teaching this talented group of ladies! They were so anxious to learn and were a pleasure to teach. Looking forward to class 102 on April 2nd from 10AM to 1PM!More on light source and blending colors, ideas on special techniques using the colorless blender. Using the markers to create clouds, color faces and hair. A fun class with a make and take project.
OK here is a recommended list for the next class.
E0000, E000, E01 or E00, R0000 or a close pale red: hair colors:
Brown hair: E23, E29 or E49(darker shadeS) Blonde hair Y26, Y28 and
Y0000 or similar. Black hair 100 or 110 (you don't need both), gray
N0 or N03. You don't need all of these just get the ones for the
color hair you want to make. Oh I forgot redheads (no offense
intented) redhair colors are E23, E35 and E11.
clouds B21 or B91

Wednesday, March 2, 2011
ART GLITTER STORE BARBARA'S BIRTHDAY BASH!


Sunday, February 27, 2011
ART GLITTER STORE IN COTTONWOOD, ARIZONA BIRTHDAY BASH
Hello again, This post is equally exciting.
On Tuesday, March 1st from 3 to 6PM, the store will host fun stuff incuding a book signing by Barbara herself. In case you don't know the story of the "Queen of Glitter" you are in for a treat!
I have been asked by Barbara to do a demo on the Cricut Machine, please come and watch. I anticipate teaching both Cricut and Copic Marker Classes at the store in the near future!! I have a link to The Art Glitter Webpage on this site, so be sure and click on it!!!! See you Tuesday!!
COPIC MARKER CLASS SCHEDULED AT HOBBY LOBBY IN PRESCOTT


This will be a beginner class and the cost will be 25 dollars, I can only except cash at this time.
You will need to bring your own markers. A total of 6 would be enough to get started. You should include a colorless blender and 3 shade of yellow and 3 shades of green. If you are unsure about the colors, Hobby Lobby does have some in the stock. I will have some paper to share and will furnish a few images to practice on. Here is schedule for the first 3 classes.
CLASS #101
Classes will be taught in a series, starting with the basics of using Copic Markers, choosing the paper that works best for you, blending techniques, including feather blending and a little on light source and highlights and shadows. We will also cover the color wheel and how the marker families work together. You will be given a couple of images to practice on.
Class#102 April 2nd 10AM to 1PM
More on light source and blending colors, ideas on special techniques using the colorless blender. Using the markers to create clouds, color faces and hair. A fun class with a make and take project.
Class #103 May 21st 10AM to 1PM
Monchromic coloring, coloring water, shadows and highlights and fun projects!
Thursday, February 24, 2011
Stamping with Markers Challenge in the Moxie Fab World
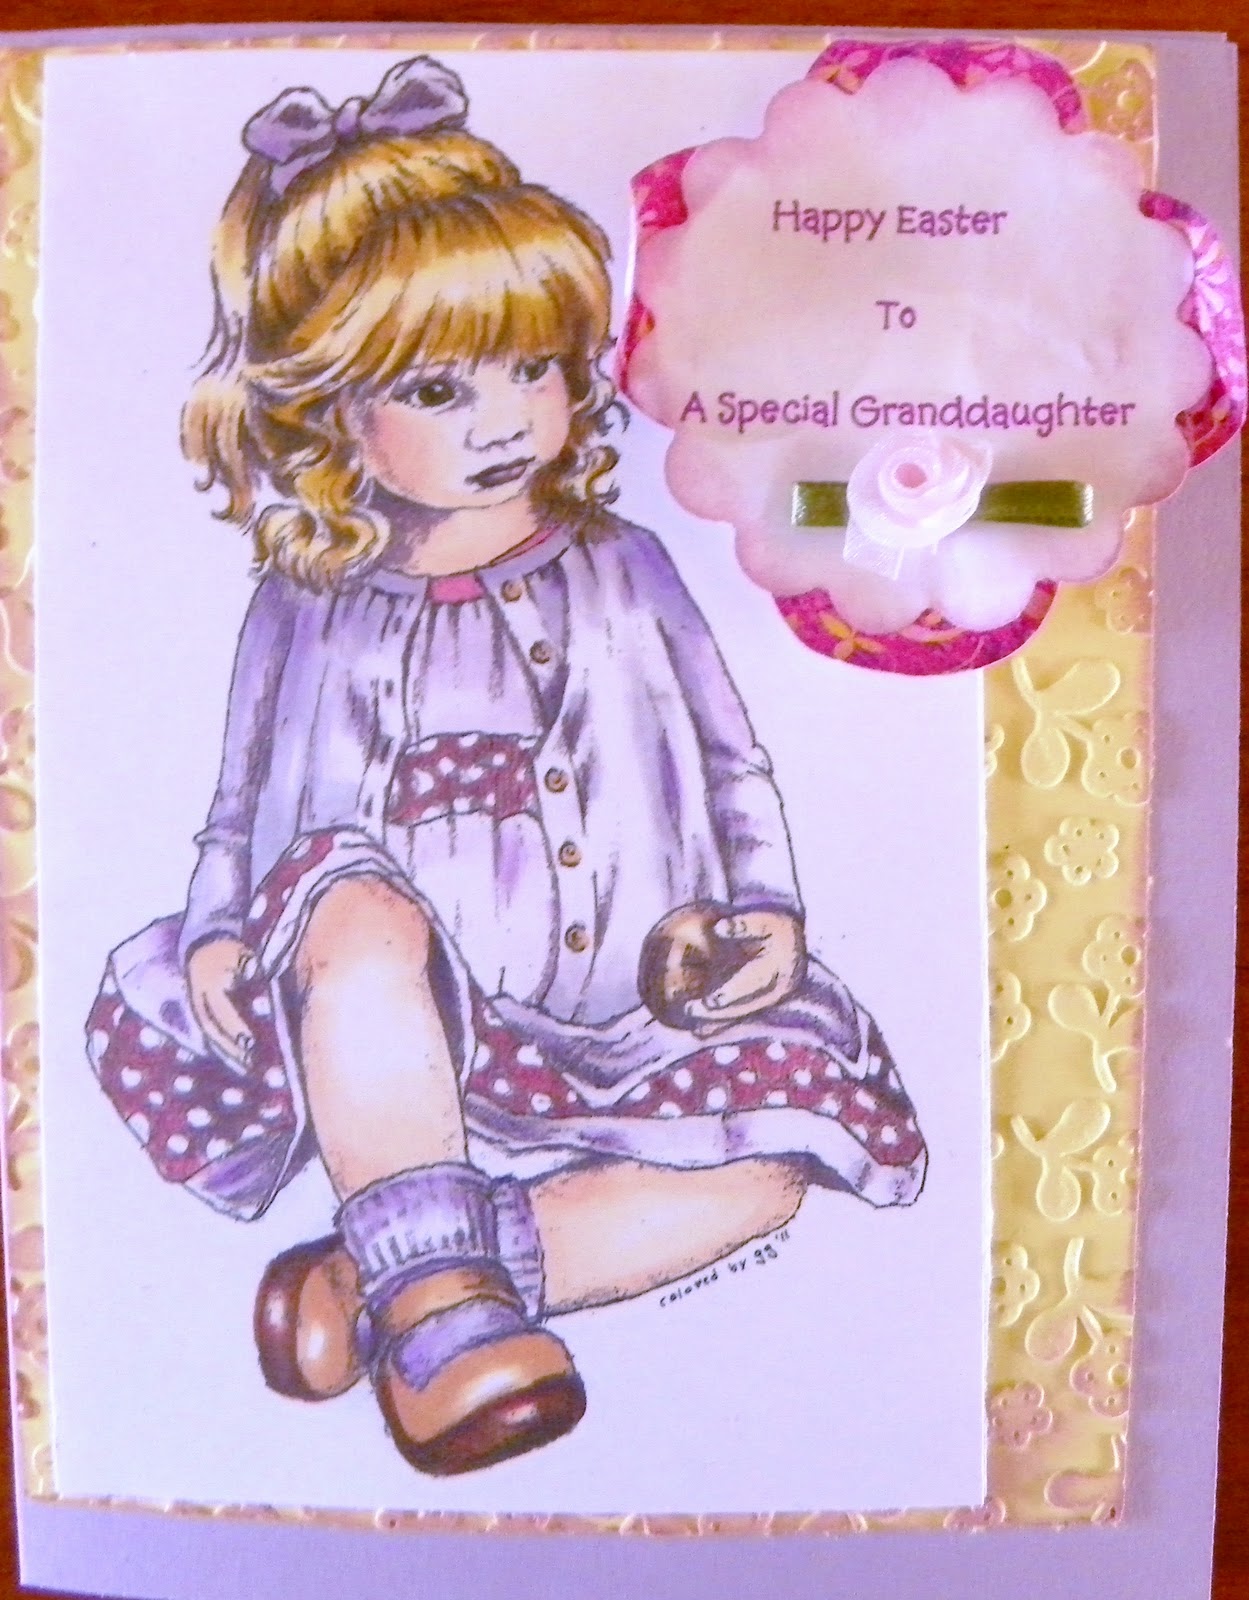
I started this card with a digi stamp from the Uk. Her name is Joy and the link to purchase her is here  http://www.funkykits.co.uk/catalog/ I colored her with my Copic markers. I like to think she is holding an Easter egg in her hand. The paper is colored cardstock and the middle layer was run thru my Sizzix Big Shot using the Sizzix large A2 Flower folder. I distressed the edges using SU ink. The sentiment lower layer is made from SU paper cut into four circles using a 1 inch round paper punch. I printed the sentiment on my computer and distressed the edges with the same ink I used on the yellow layer. The embellisment is a roset I had in my stash. I folder the edges of of the circles up after glueing them and attached the assembled sentiment with a raised double sided dimension.
 http://www.funkykits.co.uk/catalog/ I colored her with my Copic markers. I like to think she is holding an Easter egg in her hand. The paper is colored cardstock and the middle layer was run thru my Sizzix Big Shot using the Sizzix large A2 Flower folder. I distressed the edges using SU ink. The sentiment lower layer is made from SU paper cut into four circles using a 1 inch round paper punch. I printed the sentiment on my computer and distressed the edges with the same ink I used on the yellow layer. The embellisment is a roset I had in my stash. I folder the edges of of the circles up after glueing them and attached the assembled sentiment with a raised double sided dimension.
Here is the link to the challenge:
Friday, February 18, 2011
Copic Marker Intermediate Class
I just hear yesterday that I have been excepted into the April 11th Class in Phoenix! I am so excited to take that class! I will have so much more information to pass along in my classes coming up this Spring!
Right now I am in San Diego and will have some fun projects to post when I get back home after the 23rd of Feb. I will resume Copic and Cricut Classes after that date so email me at: cornvillecountrycrafts@gmail.com if you are interested
Right now I am in San Diego and will have some fun projects to post when I get back home after the 23rd of Feb. I will resume Copic and Cricut Classes after that date so email me at: cornvillecountrycrafts@gmail.com if you are interested
Wednesday, January 26, 2011
Her Name is Verity
Another adorable digi image to color from http://www.funkykits.co.uk/catalog/


Thursday, January 20, 2011
Intermediate Class with Colleeen


Tuesday, January 18, 2011
COPIC MARKERS

Copic markers come in several types and well over 350 colors. They blend beautifully and will produce a shaded image simply by adding several layers of color to an image. Copic also has an airbrush system that is both portable and user friendly. Please join in me in a class in the Verde Valley, Arizona, to learn more or go to this link http://copicmarker.com/products/markers/?page_id=55
Monday, January 17, 2011
MY COPIC MARKER CERTIFICATION
I completed the class yesterday in Phoenix and it was great!!
We needed to jog around the Rock and Roll Marathon race in order to get to downtown Phoenix since the class was on Central Avenue and the race made a loop all around the city, but thanks to my husband, Ray, he got me a map online and showed me the best way to avoid the delays by getting on the 51. What would I do without his love and support? Kudoos to Ray, I even got there early. (Left home at 6AM on a Sunday)
I enjoyed having Jennifer as our instructor and met some great ladies and fellow crafters. I wish some of them lived around Cornville.
As soon as Jen sends the link to the badge, I will proudly put it on this blog!
Thursday, January 13, 2011
THUMPER AND FLOWER FROM DISNEY
THUMPER IS PROBABLY MY FAVORITE DISNEY CHARACTER
THESE CUTE LITTLE FELLOWS WERE CUT FROM THE DISNEY CLASSIC CARTRIDGE AND ACCENTED WITH COPIC MARKERS FOR THE DETAILS. I CUT THEM USING DESIGN STUDIO BECAUSE IN ORDER TO LINE UP ALL OF THE PIECES FOR SIZING YOU NEED A LARGE IMAGE, I TRIED IT ON MY GYPSY BUT THE PIECES WERE JUST TOO SMALL ON THE SMALLER SCREEN. THE ONE ON THE RIGHT IS CUT WITH A BLACK BACKGROUND SHADOW AND TEXTURED PAPER FOR THE BODY. THE ONE ON THE LEFT HAS A WHITE BACKGROUND BUT I ENDED UP COLORING IT GRAY WITH MY MARKERS BEFORE PUTTING THE FIRST LAYER OVER IT.
ANOTHER THING I TRIED AND LIKED ALOT IS CUTTING ALL 5 SETS OF IMAGES ON WHITE PAPER AND COLORING THE SETS (THE NEW BOOKS ARE GREAT FOR THIS BECAUSE THEY SHOW THE GROUPING BY FEATURE AND COLOR). RIGHT ON THE MAT BEFORE TAKING THEM OFF, I AM NOT KIDDING THERE ARE MANY LITTLE TINY PIECES FOR EACH PART OF THE DESIGN BUT I LOVE A GOOD CHALLENGE!! I TOOK THEM OFF OF THE MAT AND LAID THEM OUT BY COLOR BEFORE ASSEMBLING THE PIECES. ONCE TOGETHER, I USED THE MARKERS TO SHADE AND HIGHLIGHT THE EDGES OF THE VARIOUS PIECES. I WILL PROBABLY USE THESE IMAGES FOR A SCRAPBOOKING PAGE FOR GAVIN'S SECOND SCRAPBOOK. NEXT TIME, I WILL FLIP THE SECOND IMAGE SO THEY CAN BE FACING EACH OTHER ON THE PAGE. WELL THANKS FOR LOOKING, IF YOU DECIDE TO TRY THIS CARTRIDGE REMEMBER THIS IS A MORE ADVANCED CART AND SHOULD NOT BE TRIED AS YOUR FIRST PROJECT. I CUT EACH IMAGE OUT 3 TIMES BEFORE I FINALLY GOT THE RIGHT SIZES FOR EACH LITTLE PIECE!!
 THIS ONE IS OF A MUCH LARGER FLOWER ALONG SIDE OF THUMPER. I JUST LOVE THE FINISHED IMAGES FROM THIS CART, I THINK BAMBI WILL BE NEXT!
THESE CUTE LITTLE FELLOWS WERE CUT FROM THE DISNEY CLASSIC CARTRIDGE AND ACCENTED WITH COPIC MARKERS FOR THE DETAILS. I CUT THEM USING DESIGN STUDIO BECAUSE IN ORDER TO LINE UP ALL OF THE PIECES FOR SIZING YOU NEED A LARGE IMAGE, I TRIED IT ON MY GYPSY BUT THE PIECES WERE JUST TOO SMALL ON THE SMALLER SCREEN. THE ONE ON THE RIGHT IS CUT WITH A BLACK BACKGROUND SHADOW AND TEXTURED PAPER FOR THE BODY. THE ONE ON THE LEFT HAS A WHITE BACKGROUND BUT I ENDED UP COLORING IT GRAY WITH MY MARKERS BEFORE PUTTING THE FIRST LAYER OVER IT.
ANOTHER THING I TRIED AND LIKED ALOT IS CUTTING ALL 5 SETS OF IMAGES ON WHITE PAPER AND COLORING THE SETS (THE NEW BOOKS ARE GREAT FOR THIS BECAUSE THEY SHOW THE GROUPING BY FEATURE AND COLOR). RIGHT ON THE MAT BEFORE TAKING THEM OFF, I AM NOT KIDDING THERE ARE MANY LITTLE TINY PIECES FOR EACH PART OF THE DESIGN BUT I LOVE A GOOD CHALLENGE!! I TOOK THEM OFF OF THE MAT AND LAID THEM OUT BY COLOR BEFORE ASSEMBLING THE PIECES. ONCE TOGETHER, I USED THE MARKERS TO SHADE AND HIGHLIGHT THE EDGES OF THE VARIOUS PIECES. I WILL PROBABLY USE THESE IMAGES FOR A SCRAPBOOKING PAGE FOR GAVIN'S SECOND SCRAPBOOK. NEXT TIME, I WILL FLIP THE SECOND IMAGE SO THEY CAN BE FACING EACH OTHER ON THE PAGE. WELL THANKS FOR LOOKING, IF YOU DECIDE TO TRY THIS CARTRIDGE REMEMBER THIS IS A MORE ADVANCED CART AND SHOULD NOT BE TRIED AS YOUR FIRST PROJECT. I CUT EACH IMAGE OUT 3 TIMES BEFORE I FINALLY GOT THE RIGHT SIZES FOR EACH LITTLE PIECE!!


Tuesday, January 11, 2011
DISNEY CLASSIC CARTRIDGE

BAMBI WAS ALWAYS ONE OF MY FAVORITE DISNEY CLASSICS SO WHEN I SAW THIS CART I JUST FELT LIKE I HAD TO HAVE IT. THIS CUTE LITTLE FELLOW IS CALLED FLOWER AND HIS FRIEND IS THUMPER RABBIT WHOM I PLAN ON SCRAPPING NEXT.
BECAUSE OF ALL OF THE LAYERS, I CHOSE TO COLOR SOME OF THE DETAILS WITH MY COPIC MARKERS AND HIGHLIGHT WITH COPIC SPICA MARKERS FOR SOME SPARKLE.. THE SENTIMENT IS FROM WILD CARD. I STARTED OUT TO MAKE THE CARD IN THE INSTRUCTION BOOK BUT ENDED UP MAKING HIM A STAND UP CARD INSTEAD. FIRST I FOLLOWED THE DIRECTIONS IN THE MANUAL CUTTING A 9" BY 6 " PINK CARD, FOLDING IT IN HALF THEN TAKING A 6 BY 4 SHEET OF OF PATTERNED PAPER, GLUED IT TO THE INSIDE OF THE CARD THEN FOLDED THE EDGES INWARDS TO MAKE 2 TRIANGLES, THIS IS WHERE I GOT LOST IN THE DIRECTIONS BUT WHEN I REALIZED THAT THIS WOULD MAKE A GREAT BASE ON WHICH TO MOUNT FLOWER, I WENT WITH IT!! I THEN CUT OUT THE FLOWER AND GLUED IT TO THE BACKROUND FLAT PIECE AND OF COURSE, HIGHLIGHTED IT WITH MY COPIC MARKERS. AFTER I CUT OUT THE SENTIMENT I GAVE IT A QUICK GLUE JOB AND COVERED IT IN ART INSTITUTE GLITTER FROM COTTONWOOD, ARIZONA. IF ANYONE COMES HERE FOR A VISIT BE SURE TO STOP IN AND SAY HI TO BARBARA AT THE ART INSTITUTE OF GLITTER IN OLDTOWN COTTONWOOD. BARBARA NOW HAS SOME SATURDAY CLASSES SO STOP IN AND SAY HELLO, YOU WON'T BE DISAPPOINTED. BARBARA SELLS GLITTER ALL OVER THE WORLD AND THEY EVEN USED HER GLITTER IN THE VICTORIA SECRETS FASHION SHOW!
Friday, January 7, 2011
DESIGN STUDIO IS A GREAT TOOL FOR SIZING CARDS TO ENVELOPES

USING DS I FIRST DESIGNED THE CARD TO BE 4" X 5". USING THE 100% VIEW OPTION, I HELD THE CARD UP TO MY COMPUTER SCREEN TO FIGURE OUT HOW BIG TO MAKE THE ENVELOPE, USING THE FOLD CUT MARKS ON THE ENVELOPE TO FIT THE BODY OF THE CARD. THIS CAN BE A BIT TRICKY BUT IT DOES WORK, FOR THIS ENVELOPE I USED WC AGAIN AS WELL AS FOR THE SENTIMENT. I CUT A MATCHING PRINTED SU PAPER TO PUT BEHIND THE HEART CUT OUTS ON THE FLAP OF THE ENVELOPE.
Thursday, January 6, 2011
GREAT HOLIDAYS IN SAN DIEGO NOW BACK TO WORK


I included a few mobils I made for the little girls in my life as Christmas presents. They were so much fun to make using many of my Cricut Cartridges.
Subscribe to:
Posts (Atom)